
Lenses can cause flare when any direct and bright light source is viewable either in the frame or sometimes from the outside.
One of the major problems for landscape photographers is the Sun. It is not actually the Sun that shows the flare, but the lens design itself. The more glass elements the lens has and the total number of Aperture blades all have a direct impact on the type of flare seen in images.
The most desirable of these is the star burst effect, caused by stopping the lens down to a small aperture.
This, in most cases produces a dynamic image and can be used creatively.
The other type of flare that can cause serious annoyance to the photographer, is the one that shows sunlight and reflections off of the elements themselves and is most often seen shooting with the sun slightly off centre. A good test for yourself is to take two images, one with the sun dead centre one based on the rule of thirds. The centre sun image will show little flare, but we don’t always compose dead centre! The other image based on the rule of thirds will have significant flare. Trouble.
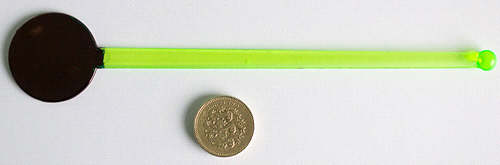
So, how do we get around having the Sun not centralised. There are numerous tricks to employ and the one described comes in several formats, The old `hat trick` trick, your hand or what I use is a Cocktail stirrer painted black.
This method does require some post production work to make it a viable option, but its not that difficult if you have already read the Basic Image Blending PDF.
Whilst there are many ways of blending, this is by far the simplest method to show. A Google search will turn up plenty of other options and discussions, both for and against digital blending.
Some photographers use HDR (High Dynamic Range) techniques. This generally leaves a much to be desired image, usually flat in contrast and edge halos where the computer thinks it know best. Its easily spotted and mostly looks `fake`. Any craftsman will tell you perfection takes time. So does manual blending, but the results speak for themselves.
REMEMBER NEVER LOOK AT THE SUN DIRECTLY THROUGH THE CAMERA OR YOUR EYES!
The method
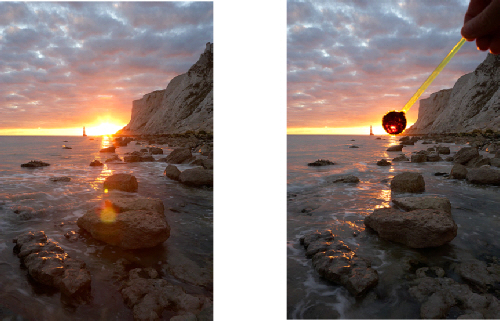
When taking your picture, take two exposures. One for the sky and one for the ground. Make sure all settings are equal apart form the shutter speed. A tripod is a must. When taking the image for the sky, hold the cocktail stick over the sun during the exposure.
Process one file for the sky and one for the foreground in your raw converter and import both files.
From the files below, you can clearly see a loss in contrast on the left image due to flare.
Using the move tool, drag the lighter image into the dark image. This will create a new layer in the layers palette. Select all and align images horizontally and vertically.
Depending on your image, either draw a line using the Lasso tool for irregular foregrounds, trees etc. or for this image I used the Marquee tool. Draw only around the foreground area.
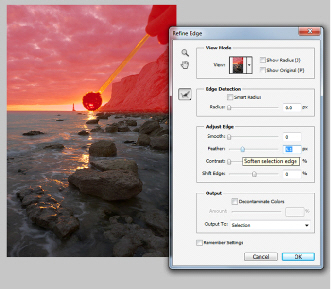
Once you have done this, proceed to the top Photoshop bar to find the refine edge
tool or find it under Select -
Using the feather command, select a percentage of around 25%-
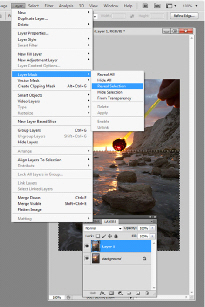
Click OK, when you have feathered the edges. Proceed to the top bar and select the Layer command. Drop down the box until you see Layer Mask which flies out and offers a selection of options, click Reveal selection
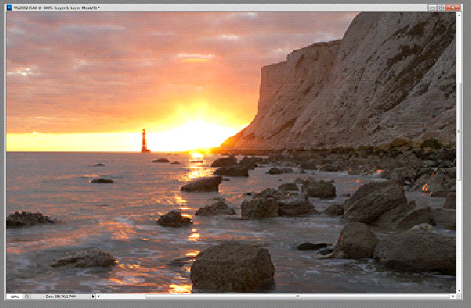
You will then see the sky area with the Cocktail stirrer disappear, leaving the foreground without flare problems and no intrusion in to the sky region.
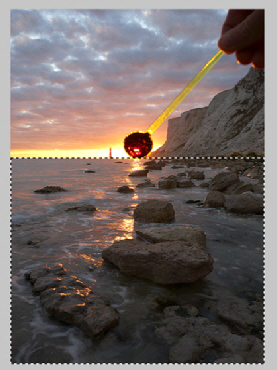
You will however note from this image that the stirrer is still viewable. This is because of how close the Sun was to the horizon and the feathering of the mask. So we need to tidy that up.
In the previous image you can clearly see the offending item. Using the Eraser Tool and the white colour selection and selecting a suitable size brush we can slowly work around that area only, revealing the sun behind. If you make a mistake and do to much, select the Black colour and repaint in the area you uncovered. After a few quick strokes the image is completed, allowing any further adjustments you may want do.
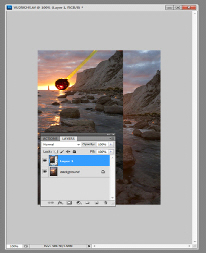
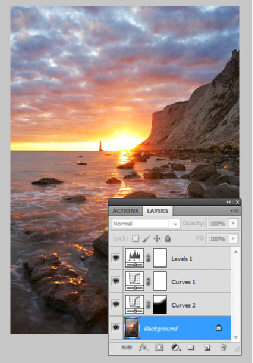
After all other adjustments are completed, the end file should look something similar. Notice the other layer showing localised adjustments denoted by the black and white `masks` in `curves 2`. `Levels 1` and `Curves 1` are global adjustments meaning they affect the whole image.
This method is by no means infallible, but by using this simple method flare can be controlled easily. It will take a little practising in holding the Stirrer still during the exposure, and normally results in a few failed attempts.
Also remember that your Graduated filters and ND filters can also cause flare problems from scratches and dust. Even the very best and most expensive lenses to some degree will have problems, yet sometimes even the cheapest of lenses can perform very well indeed. Good Luck!
HINT: For those that don’t have the latest version of PS or Elements you can substitute the refine edge tool.
At the bottom of the tool palette there is a rectangle with a circle in it. Hover
your mouse and it says `Edit in quick mask mode`. Select that once you have drawn
around the foreground with the Lasso tool. It will turn red as seen above. Go to
Filters-